Difference between revisions of "Mission:Scattered Cargo"
m (Text replacement - "Example.jpg" to "Replace-me.png") |
|||
| (3 intermediate revisions by 2 users not shown) | |||
| Line 18: | Line 18: | ||
|missionTeleporters= [[Cayuze]] | |missionTeleporters= [[Cayuze]] | ||
|missionLocations= [[Cayuze]] | |missionLocations= [[Cayuze]], [[Amethera LA7]] | ||
|missionStartingRequirements= Completion of [[Mission:Calculate_Trajectory|Calculate Trajectory]] | |missionStartingRequirements= Completion of [[Mission:Calculate_Trajectory|Calculate Trajectory]] | ||
|missionObjectives= <ul><li>Locate Cargo</li><li> | |missionObjectives= <ul><li>Locate Cargo</li><li>Return to Fujiko Takida</li></ul> | ||
|missionNecessaryEquipment= | |missionNecessaryEquipment= None | ||
|missionUnavoidableEnemies= | |missionUnavoidableEnemies= None | ||
|missionPossibleEnemies= | |missionPossibleEnemies= [[Araneatrox]], [[Itumatrox]], [[Bristlehog]], [[RipperSnapper]], [[Leviathan]] | ||
|missionCosts= | |missionCosts= 0 PED (if you don't shoot or translocate) | ||
|missionRewards= | |missionRewards= Unlock for [[Mission:Clear the Area|Clear the Area]]. | ||
|nextMissionName= | |nextMissionName= | ||
| Line 50: | Line 50: | ||
<!-- The official text of the description of the mission in game goes here --> | <!-- The official text of the description of the mission in game goes here --> | ||
"Search three debris fields for cargo, and locate at least five crates in each area." | |||
== Walkthrough == | == Walkthrough == | ||
| Line 56: | Line 56: | ||
====Start==== | ====Start==== | ||
<gallery> | <gallery perrow=3> | ||
Image: | Image:Replace-me.png|Go to the [[Cayuze|Cayuze TP]] on [[Amethera]]. | ||
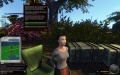
Image:Fujiko_Takida_Cayuze.jpg|Find the quest giver Fujiko Takida next to the TP at (20205, 39716, 107). | Image:Fujiko_Takida_Cayuze.jpg|Find the quest giver Fujiko Takida next to the TP at (20205, 39716, 107). | ||
Image:Scattered_Cargo_Start-01.jpg|Click through the dialogue. | Image:Scattered_Cargo_Start-01.jpg|Click through the dialogue. | ||
| Line 70: | Line 70: | ||
<gallery> | <gallery> | ||
Image: | Image:Replace-me.png|''objectives missing'' | ||
Image: | Image:Replace-me.png|''map missing'' | ||
</gallery> | </gallery> | ||
| Line 77: | Line 77: | ||
=====Objective 1.1: Find group Alpha (19274,40379) / Check crates in group Alpha===== | =====Objective 1.1: Find group Alpha (19274,40379) / Check crates in group Alpha===== | ||
On [[Amethera LA7]] you might encounter [[Araneatrox]], [[Itumatrox]], [[Bristlehog]]. | |||
<gallery> | <gallery> | ||
| Line 83: | Line 85: | ||
Image:Scattered_Cargo_Locate_Cargo-04.jpg|To complete the objective "Check crates in group Alpha" you have to operate each of the 5 cargo containers. To keep the overview it's recommended to drag each container's status bar. | Image:Scattered_Cargo_Locate_Cargo-04.jpg|To complete the objective "Check crates in group Alpha" you have to operate each of the 5 cargo containers. To keep the overview it's recommended to drag each container's status bar. | ||
Image:Scattered_Cargo_Locate_Cargo-05.jpg|As soon as operating the last of the 5 containers the objective "Check crates in group Alpha" is completed. | Image:Scattered_Cargo_Locate_Cargo-05.jpg|As soon as operating the last of the 5 containers the objective "Check crates in group Alpha" is completed. | ||
</gallery> | </gallery> | ||
| Line 91: | Line 92: | ||
<gallery> | <gallery> | ||
Image:Scattered_Cargo_Locate_Cargo- | Image:Scattered_Cargo_Locate_Cargo-06.jpg|Group Beta is a little harder to spot since it is located in the ocean. As soon as you reach it the objective "Find Group Beta" turns completed. | ||
Image:Scattered_Cargo_Locate_Cargo- | Image:Scattered_Cargo_Locate_Cargo-07.jpg|Consequently you have to dive for the containers. Dragging status bar helps even more here. And beware of [[RipperSnapper|RipperSnappers]]. | ||
Image:Scattered_Cargo_Locate_Cargo- | Image:Scattered_Cargo_Locate_Cargo-08.jpg|As soon as operating the 5th container the objective "Check crates in group Beta" gets completed. | ||
</gallery> | </gallery> | ||
| Line 101: | Line 102: | ||
<gallery> | <gallery> | ||
Image: | Image:Scattered_Cargo_Locate_Cargo-10.jpg|Group Gamma is even deeper in the ocean. As soon as you reach it the objective "Find Group Beta" is completed. | ||
Image: | Image:Scattered_Cargo_Locate_Cargo-09.jpg|If you need some extra thrill check this location at night with your [[wikipedia:HUD_(video_gaming)|HUD]] (radar) hidden... ([[Leviathan]]) | ||
Image:Scattered_Cargo_Locate_Cargo-11.jpg|As soon as operating the 5th container the objective "Check crates in group Gamma" is completed and "Return to Fujiko Takida" gets activated. | |||
</gallery> | |||
<br style="clear: both" /> | |||
=====Objective 2: Return to Fujiko Takida===== | |||
<gallery> | |||
Image:Fujiko_Takida_Cayuze.jpg|Return to Fujiko Takida at Cayuze at (20205, 39716, 107). | |||
Image:Scattered_Cargo_Return-01.jpg|Click through the dialogue. | |||
Image:Replace-me.png|''dialogue missing'' | |||
</gallery> | </gallery> | ||
| Line 110: | Line 122: | ||
<gallery> | <gallery> | ||
Image: | Image:Scattered_Cargo_Completion.jpg|By the end of the dialogue the mission is completed and you can get the next mission. | ||
</gallery> | </gallery> | ||
The reward for completing this mission is | The reward for completing this mission is the unlock for the next mission [[Mission:Clear the Area|Clear the Area]]. | ||
[[Category:Ishido Salvage Operations Mission Chain]] | |||
{{#mission:126}} | |||
Latest revision as of 11:38, 31 March 2017
|
| MISSION FACT SHEET | ||
|---|---|---|
|
|
Mission Name | Scattered Cargo |
|
|
Quest Chain | Ishido Salvage Operations Mission Chain |
|
|
Mission Type | Scouting |
|
|
Release Date (VU) | 2010.3 |
|
|
Personal Status | {{{missionPersonalStatus}}} |
|
|
StartingLocation | Cayuze |
|
|
Quest Giver | Fujiko Takida (20205, 39716, 107) |
|
|
Helpful Teleporters | Cayuze |
|
|
Related Locations | Cayuze, Amethera LA7 |
|
|
Requirements | Completion of Calculate Trajectory |
|
|
Mission Objectives |
|
|
|
Necessary Equipment | None |
|
|
Unavoidable Enemies | None |
|
|
Possible Enemies | Araneatrox, Itumatrox, Bristlehog, RipperSnapper, Leviathan |
|
|
Approximate Costs | 0 PED (if you don't shoot or translocate) |
|
|
Rewards | Unlock for Clear the Area. |
|
|
Next Missions | [[]] |
| Template:Mission Fact Sheet V1.0 | ||
General[edit]
This mission is the 2nd mission of the Ishido Salvage Operations Mission Chain released in the Planet Calypso Content Release 2010.3.
It is set around Cayuze TP.
Completely new to missions? Check the brief Missions Guide.
In-Game Description[edit]
"Search three debris fields for cargo, and locate at least five crates in each area."
Walkthrough[edit]
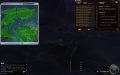
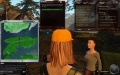
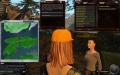
Start[edit]
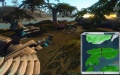
Find the quest giver Fujiko Takida next to the TP at (20205, 39716, 107).
Click through the dialogue.
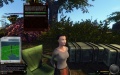
Dialogue.
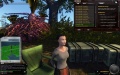
The end of the dialogue officially starts the mission.


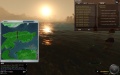
Objective 1: Locate Cargo[edit]

objectives missing
map missing
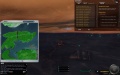
Objective 1.1: Find group Alpha (19274,40379) / Check crates in group Alpha[edit]
On Amethera LA7 you might encounter Araneatrox, Itumatrox, Bristlehog.
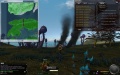
Group Alpha is located on Amethera LA7 north of the river. It's easy to spot from distance due to the ascending smoke (and if you watch the ground you might find a Papplon or two).
If you are close enough the single crates / cargo containers appear as orange dots on the radar. Even closer and the objective "Find group Alpha" is marked completed.
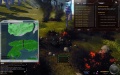
To complete the objective "Check crates in group Alpha" you have to operate each of the 5 cargo containers. To keep the overview it's recommended to drag each container's status bar.
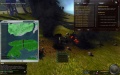
As soon as operating the last of the 5 containers the objective "Check crates in group Alpha" is completed.


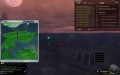
Objective 1.2: Find Group Beta (20602,38440) / Check crates in group Beta[edit]
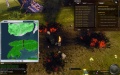
Group Beta is a little harder to spot since it is located in the ocean. As soon as you reach it the objective "Find Group Beta" turns completed.
Consequently you have to dive for the containers. Dragging status bar helps even more here. And beware of RipperSnappers.
As soon as operating the 5th container the objective "Check crates in group Beta" gets completed.


Objective 1.3: Find Group Gamma (20834,37199) / Check crates in group Gamma[edit]
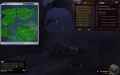
Group Gamma is even deeper in the ocean. As soon as you reach it the objective "Find Group Beta" is completed.
As soon as operating the 5th container the objective "Check crates in group Gamma" is completed and "Return to Fujiko Takida" gets activated.


Objective 2: Return to Fujiko Takida[edit]
Return to Fujiko Takida at Cayuze at (20205, 39716, 107).
Click through the dialogue.
dialogue missing

Completion & Reward[edit]
By the end of the dialogue the mission is completed and you can get the next mission.

The reward for completing this mission is the unlock for the next mission Clear the Area.
{{#mission:126}}